


Below is my own workflow for storing my collection of digital photographs, which during the last count contained 20,950 digital files. I am not a professional photographer but with such volume of files I felt I needed a system to keep track of digital photographs I have accumulated since 2000 when I switched to digital photography. I feel that the methodology I am using is applicable to any home-based, casual photographer. A variation of this methodology, with different hardware, could be applied to the case of professional photographers with much larger portfolios, but the focus of this post is the casual, amateur photographer.
In the past, most of us kept our printed photographs in a drawer or two, or in a few photo albums – at best. In the worst of cases our photographs were to be found all over the place, throughout our homes. In the good-old era of printed photography, longevity was ensured by “housekeeping” our printed photographs. Although with standard commercial, mass-produced photo papers printed quality suffers progressively as time goes by, there was still something left to “pass-on”.
These days everyone seems to have made the switch to digital photography. The potential for ensuring longevity without loosing quality is huge, but many people manage to loose their digital photos for ever. Not many of us have a system of how to store our digital photographs and secure our collection’s longevity through the eons.
In this post I am describing the method and workflow I am using for storing my own digital photographs. But first, let’s list some of the major challenges in storing digital photographs:
- Reliable process: We need a process that works all the times. For example, if our process involves burning CDs, we need to ensure that the burning method we use is reliable.
- Cost: Keep purchasing new memory cards and leaving our photos intact on memory chips off our camera is a costly storage method, and contradicts one of the biggest reasons we moved to digital photography in the first place! No film required. We can reuse our memory flash cards. They are called “flash” cards for a reason.
- Capacity: We need a system that can hold many gigabytes of digital photographs. Camera resolution is increasing rapidly, which means that as time goes-by higher capacity of storage space will be required.
- Portability: Ideally, we want to be able to evacuate our photographs as part of those very few things we would like to take with us in case of an emergency (i.e. a fire, or flood.) Unplugging and carrying a computer might not do the trick during an emergency situation.
- Easy to find photographs: Although the subject of how we index our photos so that we can easily retrieve them in the future is not the subject of this post, a storage system that also offers some method of easy retrieval would be desirable.
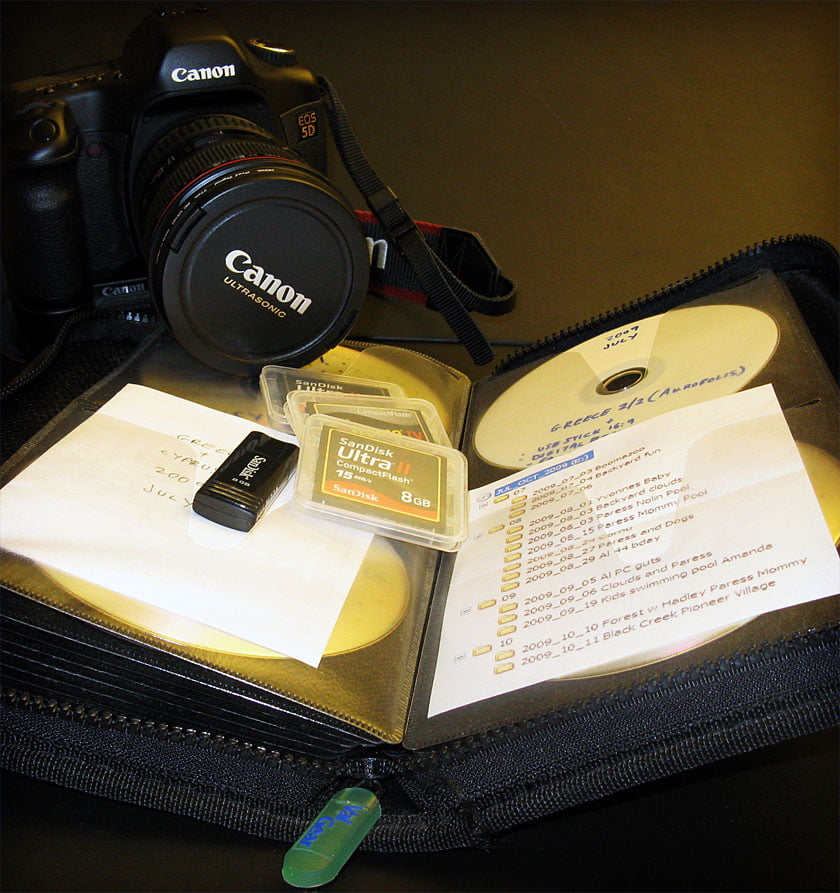
In a nutshell, I always keep every photograph on at least two different storage devices. I go from camera to a USB stick (which I call a “buffer”) and onto a hard drive, and once the USB stick has reached the capacity of an external, portable storage media (currently I use Dual Layer DVDs) I copy the contents of the USB stick onto the external media, then erase the USB stick and start the process from the top.
I keep my whole collection chronologically within a tree of directories and sub-directories (aka: “folders”, “sub-folders”). The outer layer of directories contains years. Under each year I open twelve sub-directories: YEAR-XX. For example, 2010-01 for January of 2010, 2010-02 for February of 2010, and so on. This ensures proper sorting in any directory structure, now and in any future operating system, and also ensures that if for any reason I decide in the future to move or copy the contents of a specific month elsewhere, the year of that month travels with the rest of the stuff.
Under each month subdirectory I have more subdirectories, one for each “subject” or “set” of photographs. I give short, inclusive and descriptive names. For example, “2010_10_28 Halloween Brookdale” is a sub-directory under 2010/2010-10 and contains photos from Halloween party at Brookdale, on October 28, 2010.
I do keep a few extra memory chips in my photo bag in case one is filled-up on-location. My CANON 5D users CompactFlash cards, and I use the 8GB version, which holds approximately 500 frames in RAW resolution. (I shoot in RAW, so that I can easily correct exposure errors in my Photoshop-darkroom. Overall, I have a mobile capacity of roughly 2000 frames, which is more than sufficient for my own type of photography, even during trips.
Once I find the time I download from the flash card to my PC onto the proper folder as explained above, and at the same I copy the same download batch onto an 8GB USB memory stick. The batch is now on the CompactFlash card, on my hard drive and on the USB memory stick. At the end of this download process, I erase the CompactFlash card and re-use it. Once the CompactFlash is erased I know that its contents are safe elsewhere.
This process is repeated until the USB memory stick reaches its full capacity, 8GB. Then, I burn a dual layer DVD with the contents of the USB memory stick and I now erase and reuse the USB memory stick. Note that the capacity of a dual layer DVD today is 8GB, exactly the capacity of the USB memory stick. This is now the final place for my photographs. They are again found on two different locations, but the most important to me are the DVDs. I store them in a portable binder and each one carries a printout of its directory structure contents. (I print only the directory/sub-directory structure, not the actual files inside each sub-directory.)
For my day-to-day searching and retrieval of photographs I use the hard drive copy. I never touch the DVDs to minimize the risk of damaging them and their contents. They remain safe within the binder. For browsing I use CANON’s Zoombrowser, but any other photo browsing system should suffice. It is important that you use a system that reads images directly off the hard drive. A system that uses its own proprietary storing system on your hard drive won’t do you any good in the future when you decide to use a new system. Using the naming convention described above even the rudimentary, build-in thumbnail system of your computer’s operating system should be enough to help you find what you are looking for.
As technology progresses, disks with higher capacities become available. Blu-ray disks will soon be able to write up to 128GB on each disk and Panasonic is working on a layering technology that will allow capacities of 500GB on a single disc. At that point, we need to simply change the hardware, but the process can remain the same. Our USB stick (the “buffer”) needs to be replaced with a device that has the same capacity as the final storage device. For example, we would need a 500GB USB memory stick, or a 500GB USB hard drive that’s portable enough to carry with the rest of our collection in our binder in case of an emergency evacuation.
I hope this method works for you too, and that you will also find it fun and enjoyable to use, while at the same time ensuring that your photographs are safe, without burning a hole in your pocket.


RECENT COMMENTS